Flux and SOPS on AKS with workload identity
The post and the repository has been updated on 07-05-2025 to use latest versions of sops, kubectl, azure apis. The devcontainer is modified to be able to use it with podman.
Setting up sops with flux and workload identity on AKS is not a complex procedure however there is a lack of proper documentation for some steps.
I was working on setting this up on Azure Kubernetes Service and getting stuck at the point where I had to actually decrypt a secret from a sample deployment.
The key point to understand is that the application responsible for decrypting the secrets is the kustomize-controller. We aim then to have a managed identity assigned to the service-account of the kustomize-controller deployed by flux and to enable workload identity on both the service account and the pods. This requires some azure specific labels and annotations to be added to the k8s resources.
I aim to provide a recap on how to deploy all of this with links to the relevant documentation and add the sample yaml needed to assign and use the identity.
We aim to have:
- An AKS cluster deployed with workload identity enabled
- A managed identity with a federated credential
- A key vault to store the encryption key, an encryption key and access policy to allow the managed identity to encrypt using the key
- A github repo to be our source of truth for k8s deployment
- Flux deployed in the cluster
- Flux resources patched to enable workload identity
- A sample encrypted secret in the repo
If you just want to check the end result this is the repo with all the files.
Please note that there some values in the files and scripts that needs to be updated according to your environment, such as resource group name or reference to github repo.
Required tooling on workstation
We will use:
- az CLI
- Flux CLI
- sops CLI
In addition to that but not strictly required:
- vs code with bicep extension for code editing
- kubectl for troubleshooting/inspection of k8s cluster
I'll perform the deployment from a devcontainer based on debian with all the tools required already installed but of course this is doable from any Windows/Linux machine and from WSL within Windows.
I will add some description for all the steps below and I will provide a repo with all the scripts and yaml files organized into two folders:
- iac
- gitops
A better approach would be to have two github repos, one for infrastructure, one for k8s deployment. However I want to keep things manageable for this post and I'll use just one repo. I structured the azure resources in 3 modules, described below. A main.bicep file put everything together.
The iac folder contains a deploy.sh script that execute the bicep deployment.
AKS with workload identity enabled - aks.bicep
There are several options to deploy a workload enabled cluster on Azure. My preferred option is to go with bicep, since it has decent tooling and it is idempotent by default.
Regardless of the deployment method, we need to enable workload identity and get the OIDC issuer URL for the cluster to be used in a subsequent step.
The OIDC Issuer URL is required to set up the federated credentials on the managed identity that's why we have it as an output.
This is my sample deployment.
param location string

resource aks 'Microsoft.ContainerService/managedClusters@2025-02-01' = {
  name: 'my-aks'
  location: location
  identity: {
    type: 'SystemAssigned'
  }
  sku: {
    name: 'Base'
    tier: 'Free'
  }
  properties: {
    kubernetesVersion: '1.32'
    agentPoolProfiles: [
      {
        name: 'system'
        mode: 'System'
        vmSize: 'Standard_B2ms'
        count: 1
        enableAutoScaling: false
        osType: 'Linux'
        osSKU: 'AzureLinux'
      }
    ]
    dnsPrefix: 'my-aks-dns'
    oidcIssuerProfile: {
      enabled: true
    }
    securityProfile: {
      workloadIdentity: {
        enabled: true
      }
    }
    networkProfile: {
      loadBalancerSku: 'basic'
    }
  }
}

output oidcIssuerURL string = aks.properties.oidcIssuerProfile.issuerURL
Managed identity - mi.bicep
The managed identity is going to be used by the kustomize-controller to get access to the encryption key. The service account of the kustomize-controller has an account token that is going to be exchanged with an azure ad token that will permit access to the key-vault.
We will use the principal id to allow the managed identity to access the encryption key.
param location string

param aksIssuerURL string

resource managedIdentity 'Microsoft.ManagedIdentity/userAssignedIdentities@2024-11-30' = {
  name: 'kustomize-controller-mi'
  location: location
}

resource federatedCredentials 'Microsoft.ManagedIdentity/userAssignedIdentities/federatedIdentityCredentials@2024-11-30' = {
  name: 'aks-fc'
  parent: managedIdentity
  properties: {
    audiences: [
      'api://AzureADTokenExchange'
    ]
    issuer: aksIssuerURL
    subject: 'system:serviceaccount:flux-system:kustomize-controller'
  }
}

output objectId string = managedIdentity.properties.principalId
The subject field for a federated credential for a Kubernetes service accounts always follow the same pattern: system:serviceaccount:[namespace]:[service account name]. Please also note that every namespace in Kubernetes as a default service account so you might not need to create a new one. In this particular case I'm using the namespace and the service account flux is creating.
KeyVault - kv.bicep
Deploy a key vault with bicep, adding an encryption key and relevant access policies.
pparam location string

param managedIdentityObjectId string

resource keyVault 'Microsoft.KeyVault/vaults@2024-11-01' = {
  name: 'my-kv-${uniqueString(resourceGroup().id)}'
  location: location
  properties: {
    sku: {
      family: 'A'
      name: 'standard'
    }
    tenantId: tenant().tenantId
    accessPolicies: [
      {
        objectId: managedIdentityObjectId
        tenantId: tenant().tenantId
        permissions: {
          keys: [
            'get'
            'decrypt'
          ]
        }
      }
    ]
  }
}

resource key 'Microsoft.KeyVault/vaults/keys@2024-11-01' = {
  name: 'encryption-key'
  parent: keyVault
  properties: {
    attributes: {
      enabled: true
      exportable: false
    }
    kty: 'RSA'
    keySize: 2048
  }
}
Github repo
We will use this repo to bootstrap Flux, you want to have a dedicated repo but as I said before I'll keep all the code from the blog post in a single repo, including infrastructure as code part.
Bootstrap flux
In the gitops folder of the repo, the setup-flux.sh script I used to setup flux. Please note that the inner aks folder was empty when I ran the script.
Please update the script to refer to your github account or check Flux documentation for additional providers.
If you will use GitHub then you will be prompted for a personal access token, create one with repo access. A short expiration date is fine, Flux will add a deploy key to the repo to access it in the future.
Flux documentation states
Note that the GitHub PAT is stored in the cluster as a Kubernetes Secret named flux-system inside the flux-system namespace. If you want to avoid storing your PAT in the cluster, please see how to configure GitHub Deploy Keys.
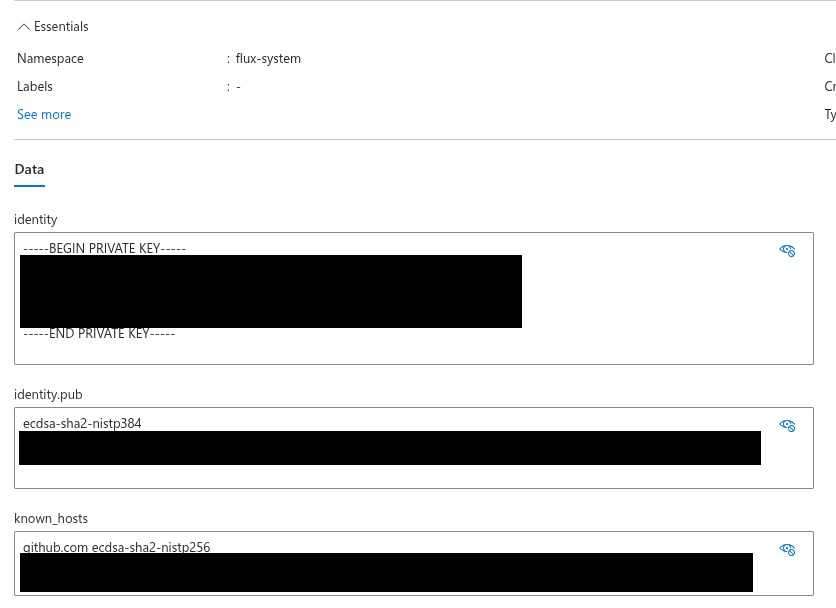
I'm checking today 07-05-2025 and, as I noticed before, the GitHub PAT is not stored into the flux-system secret as shown in the following screenshot. A newly created deploy key is contained in the secret.
The token can have a very short expiration date and it will be used only during bootstrap phase. However you cannot delete the token after it is used or expired because doing so will invalidate the deploy key.
When the command is complete the aks folder is populated with a flux-system sub-folder.
Patch flux
Now we have to "assign" the managed identity to the service account and to enable workload identity. This is the step for which I couldn't find any documentation.
To do that we will patch two resources created by Flux. I like to organize patches into a subfolder patches and have one file per resource.
Expected structure is:
- gitops:
- aks:
- flux-system:
- gotk-components.yaml
- gotk-sync.yaml
- kustomization.yaml [TO MODIFY]
- patches:
- kustomize-controller-deployment.yaml [NEW]
- kustomize-controller-service-account.yaml [NEW]
- flux-system:
- aks:
The kustomization.yaml files has to be updated to
apiVersion: kustomize.config.k8s.io/v1beta1
kind: Kustomization
resources:
- gotk-components.yaml
- gotk-sync.yaml

patches:
  - path: patches/kustomize-controller-deployment.yaml
  - path: patches/kustomize-controller-service-account.yaml
The kustomize-controller-deployment.yaml can be copied as it is, while for the kustomize-controller-service-account.yaml you will need to retrieve client id and tenant id for the deployed managed identity.
You can use the following command, possibly updating the value of the resource group name.
az identity list -g flux-workload-identity-post --query "[].{clientId: clientId, tenantId: tenantId }" --output table
Update the yaml with the relevant values
apiVersion: v1
kind: ServiceAccount
metadata:
  name: kustomize-controller
  namespace: flux-system
  annotations:
    azure.workload.identity/client-id: <your value>
    azure.workload.identity/tenant-id: <your value>
  labels:
    azure.workload.identity/use: "true"
Now commit all the changes and push. It will take a few minutes to complete the deployment. You can check the status using:
flux get all -A
Add a sample secret
Let's see the result from a file-system point of view, please setup files and folder as shown below. My repo has this final setup. Having a structure exactly like this one is probably not required, I'm not an expert on flux nor gitops, feel free to adjust to your needs.
- gitops:
- aks:
- kustomization.yaml [NEW]
- apps.yaml [NEW]
- apps:
- kustomization.yaml [NEW]
- namespace.yaml [NEW]
- secret.yaml [NEW]
- flux-system:
- gotk-components.yaml
- gotk-sync.yaml
- kustomization.yaml
- patches:
- kustomize-controller-deployment.yaml
- kustomize-controller-service-account.yaml
- aks:
You can copy the content of all files except for secret.yaml and possibly apps.yaml. Let's start with the latter:
apiVersion: kustomize.toolkit.fluxcd.io/v1beta2
kind: Kustomization
metadata:
  name: apps
  namespace: flux-system
spec:
  dependsOn:
  - name: flux-system
  interval: 2m0s
  sourceRef:
    kind: GitRepository
    name: flux-system
  path: ./gitops/aks/apps # if your folder structure is different change this path to reflect where you want to deploy the secret
  prune: true
  wait: true
  timeout: 5m0s
  decryption:
    provider: sops # here we are telling flux that we are using sops
For the secret, mine is already encrypted but we have to start with a clear text one
apiVersion: v1
kind: Secret
metadata:
    name: sample-secret
    namespace: sops-workload-identity
type: Opaque
stringData:
    sops_encrypted_secret: value of the secret
With the following command
sops -e -i --encrypted-regex '^(data|stringData)$' --azure-kv [url to the encryption key] secret.yaml
This will encrypt only the stringData part, however all the file content is added to the checksum so it cannot be changed outside of sops. From now on, to edit the secret run sops secret.yaml.
Now commit and push. After the deployment is completed, your cluster should have access to the secret:
kubectl get secret sample-secret -n sops-workload-identity -o jsonpath='{.data.*}' | base64 -d